A Comprehensive Guide to Setting Cemetery Markers and Gravestone Markers
In the solemn landscape of cemeteries, gravestone markers and monument markers serve as enduring tributes to the lives of those who have passed. These intricate stone structures not only mark the final resting place but also provide a canvas for personalized remembrance. Whether you’re honoring a loved one or planning ahead, setting cemetery markers is a delicate process that requires careful consideration and attention to detail. In this article, we’ll explore the steps involved in properly setting custom grave markers.
Understanding the Significance of Cemetery Markers
Gravestone markers and monument markers hold deep symbolic and emotional significance for families and communities. They represent a physical connection to the memory of the deceased, serving as a tangible reminder of their presence and legacy. Beyond their sentimental value, these markers also play a crucial role in identifying and preserving historical records within cemeteries.
Choosing the Perfect Custom Grave Marker
The first step in setting a cemetery marker is selecting the right design and material. From traditional upright gravestone markers to flat, flush-to-ground monuments, the options are vast. Factors such as personal preferences, cemetery regulations, and budget will guide your decision-making process.
Many families opt for custom grave markers that reflect the personality and interests of their loved one. These personalized touches can range from intricate engravings and epitaphs to symbolic imagery and unique shapes, creating a truly meaningful and one-of-a-kind tribute.
Preparing the Site for Installation
Before installing your cemetery marker, it’s essential to properly prepare the site. This typically involves:
- Obtaining necessary permits and approvals from the cemetery administration.
- Marking the exact location for the marker’s placement, ensuring it aligns with cemetery guidelines.
- Excavating the area to the appropriate depth and dimensions to accommodate the marker’s foundation.
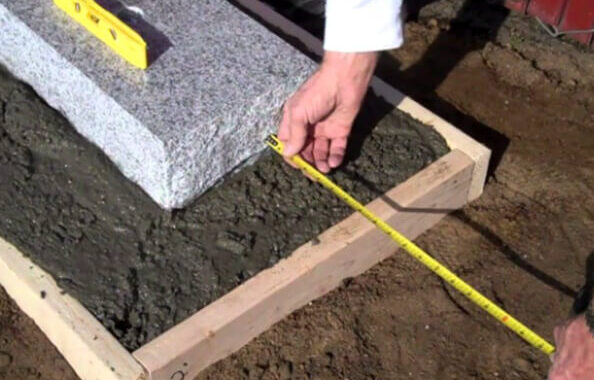
Installing the Foundation
A solid foundation is crucial for the long-term stability and durability of gravestone markers and monument markers. Depending on the marker’s size and weight, as well as local soil conditions, the foundation may consist of:
- A concrete base poured into the excavated area, allowing for proper curing before marker installation.
- A reinforced concrete slab or piers to support larger, heavier markers.
- Compacted gravel or crushed stone for added stability and drainage.
Setting the Custom Grave Marker
Once the foundation is in place, it’s time to carefully set the cemetery marker. This process typically involves:
- Using specialized equipment, such as cranes or lifting devices, to safely maneuver the marker into position.
- Ensuring the marker is level and properly aligned with the foundation.
- Securing the marker to the foundation, if necessary, using appropriate anchoring methods.
Finishing Touches
After the gravestone marker or monument marker is securely in place, the final touches can be applied. These may include:
- Applying sealants or protective coatings to the marker’s surface to enhance longevity and resistance to weathering.
- Landscaping the surrounding area with appropriate plantings or decorative elements, in accordance with cemetery regulations.
- Performing any final cleaning or polishing to ensure the marker’s optimal appearance.
By following these steps and working with experienced professionals, you can ensure that your loved one’s custom grave marker is set with the utmost care and respect, creating a lasting tribute that will stand the test of time.